Debezium Management Platform
|
This project is currently in an incubating state. The exact semantics, configuration options, and so forth are subject to change, based on the feedback that we receive. |
Debezium Management Platform aims to simplify the deployment of Debezium to various environments in a highly opinionated manner. To achieve this goal, the platform uses a data-centric view of Debezium components.
Implementing the platform represents a natural evolution from Debezium Server. Past releases provided the Debezium operator to simplify operation in Kubernetes environments. With the introduction of the platform, Debezium now provides a high-level abstraction to deploy your data pipelines in different environments while leveraging Debezium Server.
Basic concepts
In Debezium Management Platform there are four main concepts:
- Source
-
Defines the source of your data.
- Destination
-
Defines the destination of your data.
- Transform
-
Defines how a single data event is transformed as it flows through the pipeline.
- Pipeline
-
Defines how data flows from a source to a destination while being transformed along the way.
After you define a pipeline, it is deployed based on how you configure the platform.
Each pipeline is mapped to a Debezium Server instance.
For the Kubernetes environment (currently, the only supported environment) the server instance corresponds to a DebeziumServer custom resource.
Architecture
The platform is composed of the following components:
- Conductor
-
The back-end component that provides a set of APIs to orchestrate and control Debezium deployments.
- Stage
-
The front-end component that provides a user interface to interact with the Conductor.
The conductor component itself is composed of the following subcomponents:
- API Server
-
The main entry point. It provides a set of APIs to interact with the platform.
- Watcher
-
The component that is responsible for the actual communication with the deployment environment (for example, the Debezium Operator in a Kubernetes cluster).

Installation
|
Currently, the only supported environment is Kubernetes. |
-
Helm
-
Kubernetes cluster with an ingress controller
Installation is provided through a Helm chart.
-
Enter the following command to add the Debezium charts repository:
helm repo add debezium https://charts.debezium.io -
Enter one of the following commands to install the version of the platform that you want:
helm install debezium-platform debezium/debezium-platform --version 3.1.0-beta1 --set database.enabled=true --set domain.url=platform.debezium.ioOr, to use an OCI artifact to install the platform, enter the following command:
helm install debezium-platform --set database.enabled=true --set domain.url=platform.debezium.io --version 3.1.0-beta1 oci://quay.io/debezium-charts/debezium-platformThe
domain.urlis the only required property; it is used ashostin theIngressdefinition.In the preceding examples, the
database.enabledproperty is used. This property helps to simplify deployment in testing environments by automatically deploying the PostgreSQL database that is required by the conductor service. When deploying in a production environment, do not enable automatic deployment of the PostgreSQL database. Instead, specify an existing database instance, by setting thedatabase.name,database.host, and other properties required to connect to the database. See the following table for more information.
The following tables lists all the chart’s properties:
| Name | Description | Default |
|---|---|---|
domain.url |
Domain used as the ingress host |
"" |
stage.image |
Image that Helm uses to deploy the stage (UI) pod. |
quay.io/debezium/platform-stage:<release_tag> |
conductor.image |
Image that Helm uses to deploy the conductor pod. |
quay.io/debezium/platform-conductor:<release_tag> |
conductor.offset.existingConfigMap |
Name of the ConfigMap that stores conductor offsets. If no value is specified, Helm creates a ConfigMap automatically. |
"" |
database.enabled |
Enables Helm to install PostgreSQL. |
false |
database.name |
Name of an existing database where you want the platform to store data. |
postgres |
database.host |
Host of the database that you want the platform to use. |
postgres |
database.auth.existingSecret |
Name of the secret that stores the If you provide a value for this property, do not set |
"" |
database.auth.username |
Username through which the platform connects to the database. |
user |
database.auth.password |
Password for the user specified by |
password |
offset.reusePlatformDatabase |
Specifies whether pipelines use the configured platform database to store offsets.
To configure pipelines to use a different, dedicated database to store offsets, set the value to |
true |
offset.database.name |
Name of the database that the platform uses to store offsets. |
postgres |
offset.database.host |
Host for the database where the platform stores offsets. |
postgres |
offset.database.port |
Port through which the platform connects to the database where it stores offsets. |
5432 |
offset.database.auth.existingSecret |
Name of the secret that stores the If you provide the name of a secret, do not set the |
"" |
offset.database.auth.username |
Username through which the platform connects to the offsets database. |
user |
offset.database.auth.password |
Password for the offsets database user specified by |
password |
schemaHistory.reusePlatformDatabase |
Specifies whether pipelines use the configured platform database to store the schema history.
To configure pipelines to use a different, dedicated database to store the schema history, set the value to |
true |
schemaHistory.database.name |
Name of the dedicated database where the platform stores the schema history. |
postgres |
schemaHistory.database.host |
Host for the dedicated database where the platform stores the schema history. |
postgres |
schemaHistory.database.port |
Port through which the platform connects to the dedicated database where it stores the schema history. |
5432 |
schemaHistory.database.auth.existingSecret |
Name of the secret that stores the If you provide the name of a secret, do not set the |
"" |
schemaHistory.database.auth.username |
Username through which the platform connects to the schema history database. |
user |
schemaHistory.database.auth.password |
Password for the schema history database user specified by |
password |
env |
List of environment variables to pass to the conductor. |
[] |
Using the platform
You can use the platform UI to perform a number of different tasks.
Defining sources
Use the Source section of the UI to specify the database that hosts your data. You can configure any database that Debezium supports as a source. The source that you create can be shared among multiple pipelines. Changes to a source are reflected in every pipeline that uses it.
Creating a source
You can use either of the following editors to configure a source:
- Form Editor
-
Enables you to specify the name and description of the source, along with a list of properties. For a complete list of the properties that are available for a connector, see the connector documentation.
- Smart Editor
-
Provides a way to define the source configuration in JSON format. You can also use the editor to reformat source configurations that are designed for Debezium connectors in Kafka Connect or Debezium Server environment for use in the platform. The editor automatically applies the JSON formatting that the platform requires to the specified source configuration.

You can create source configurations based on existing Debezium configurations, such as the configuration for a Debezium connector for Kafka Connect, or a Debezium Server configuration. From the toolbar on the Source catalog page, select Create using smart editor . |
Configuring a source with the Smart Editor
You can use the Smart Editor to specify the JSON that defines the source configuration.
You can enter and edit JSON directly in the editor, or paste JSON from an external source into the editor.
The JSON that you use to configure a data source in the Debezium management platform is nearly identical to the JSON in the config section that defines the configuration for a Debezium connector on Kafka Connect or in the Debezium Server.
To reuse an existing Debezium connector configuration, you can upload a file that contains the configuration, or you can copy and paste the configuration into the Smart Editor. Stage UI intelligently recognizes the format of the configuration that you provide, and prompts you to reformat it for use by the platform.
For example, consider the following JSON for specifying the configuration of a Debezium MySQL connector on Kafka Connect:
{
  "name": "inventory-connector",
  "config": {
    "connector.class": "io.debezium.connector.mysql.MySqlConnector",
    "tasks.max": "1",
    "database.hostname": "mysql",
    "database.port": "3306",
    "database.user": "debezium",
    "database.password": "dbz",
    "database.server.id": "184054",
    "topic.prefix": "dbserver1",
    "database.include.list": "inventory"
  }
}
When you add this JSON to the Smart Editor, it detects that it is formatted for Kafka Connect and displays an alert.
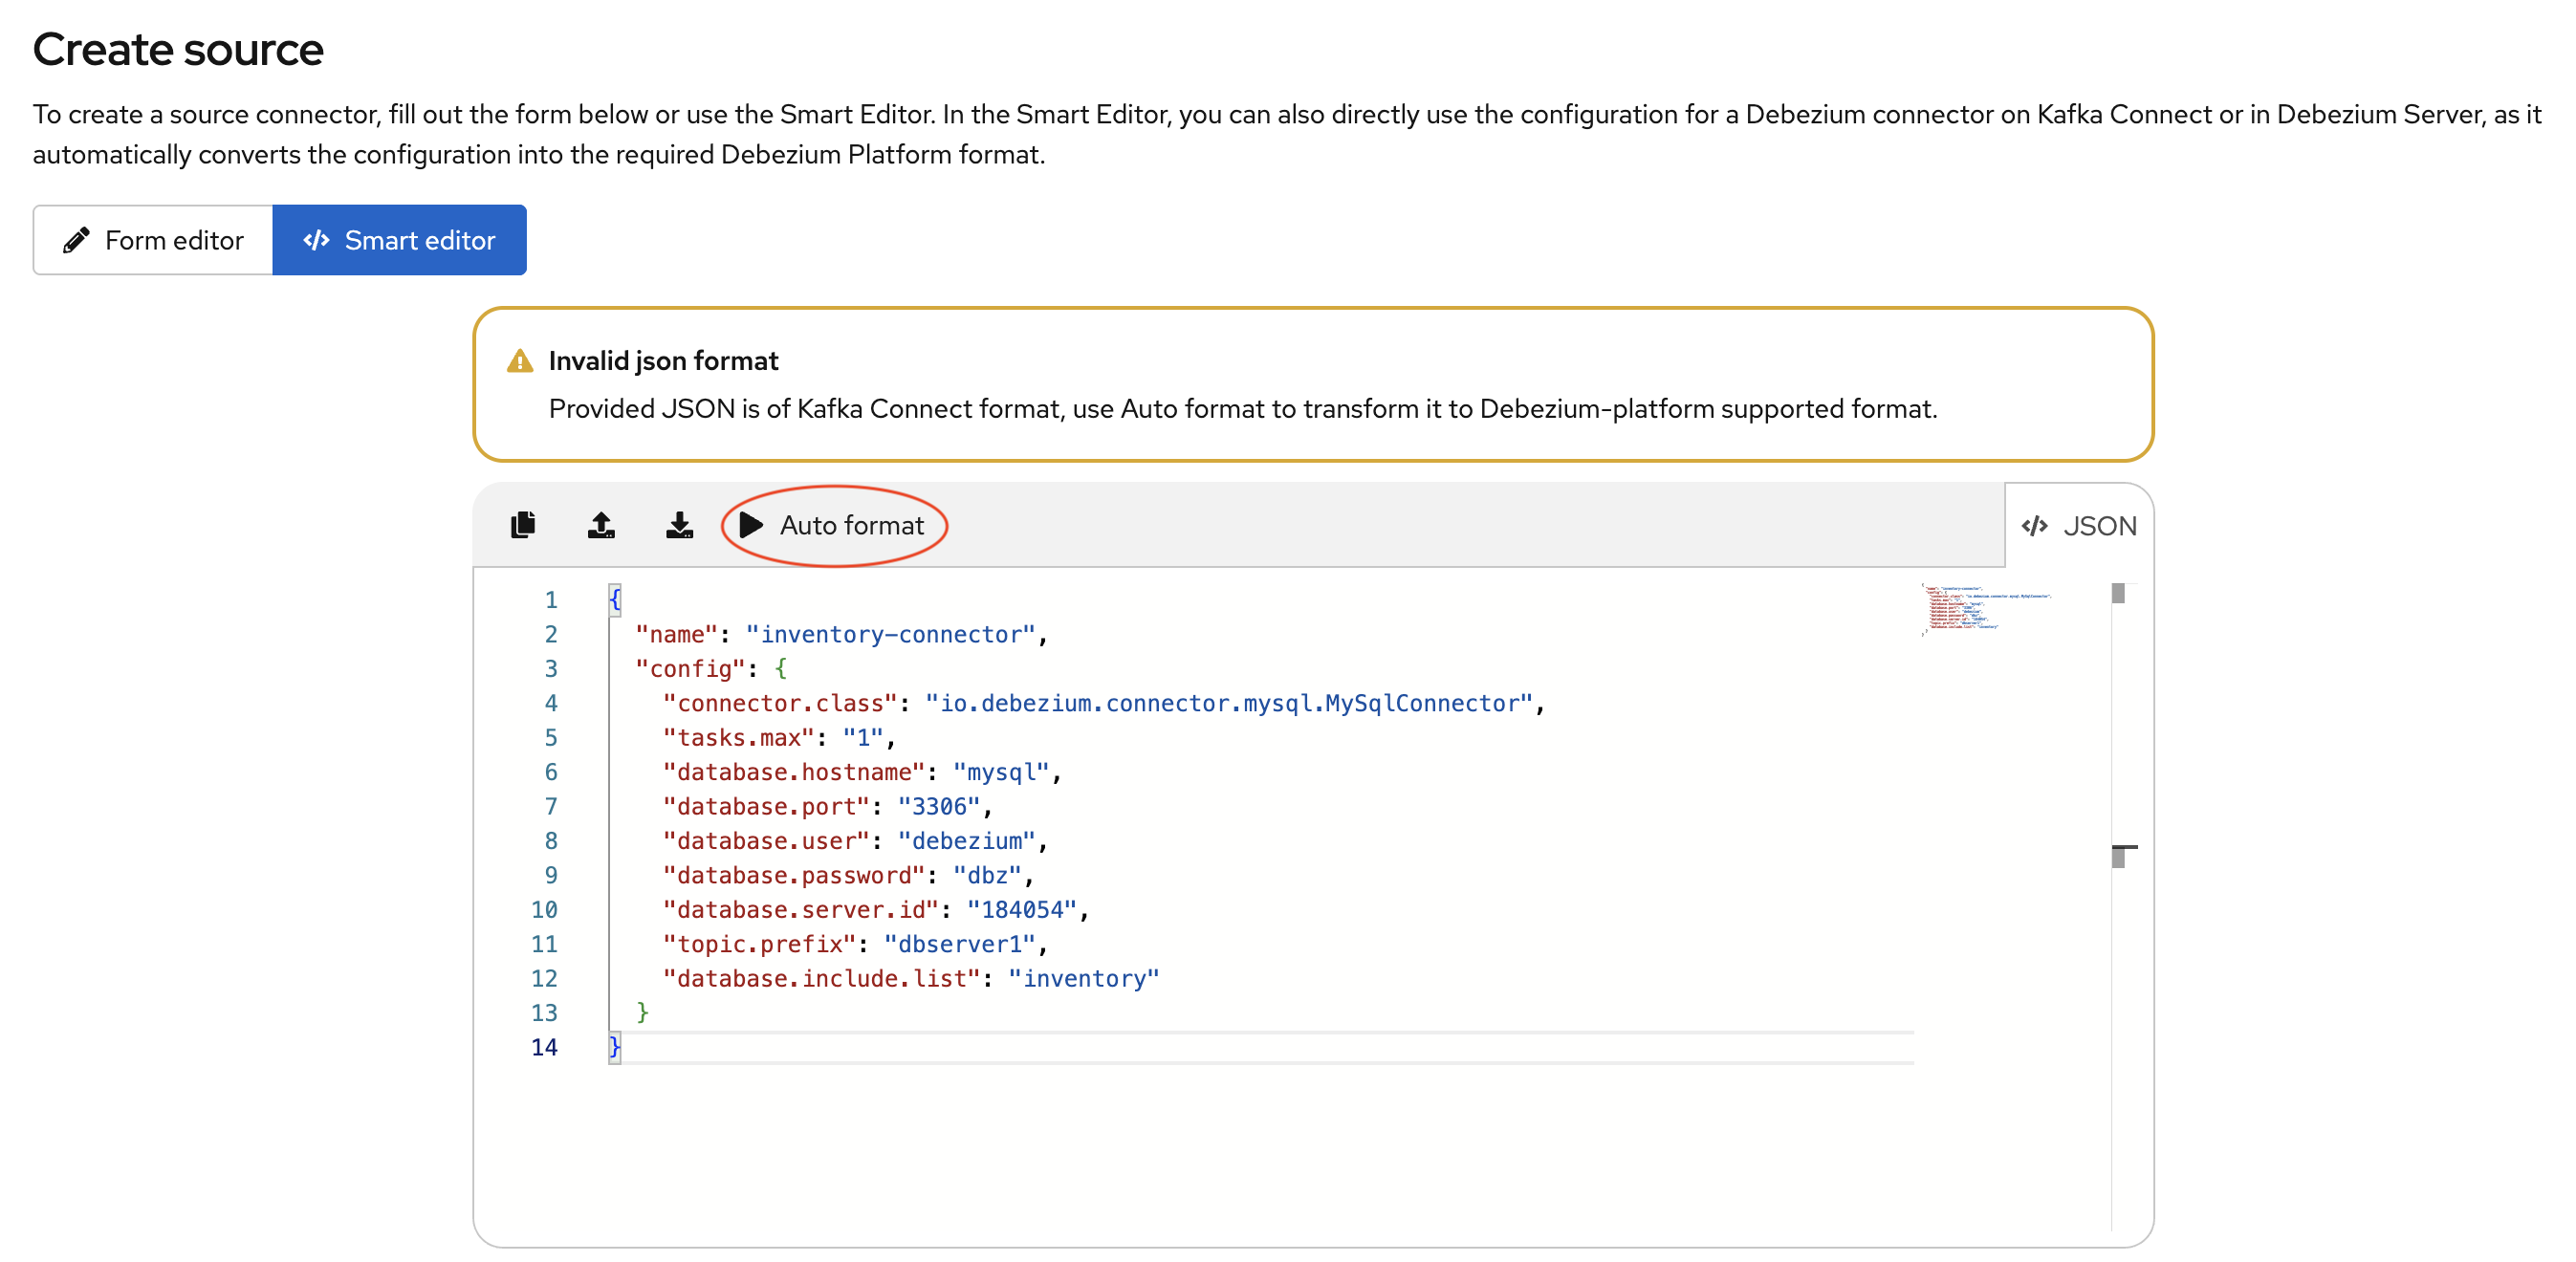
The Smart Editor toolbar then displays an Auto Format option, as shown in the preceding figure. The Autoformat option automatically converts the provided JSON into the required Debezium Platform JSON format.
The following image shows the JSON that results after you use the Autoformat option to convert the configuration for a MySQL data source.
Optionally, you can edit the JSON to update the value of the name field or populate the` description` field.
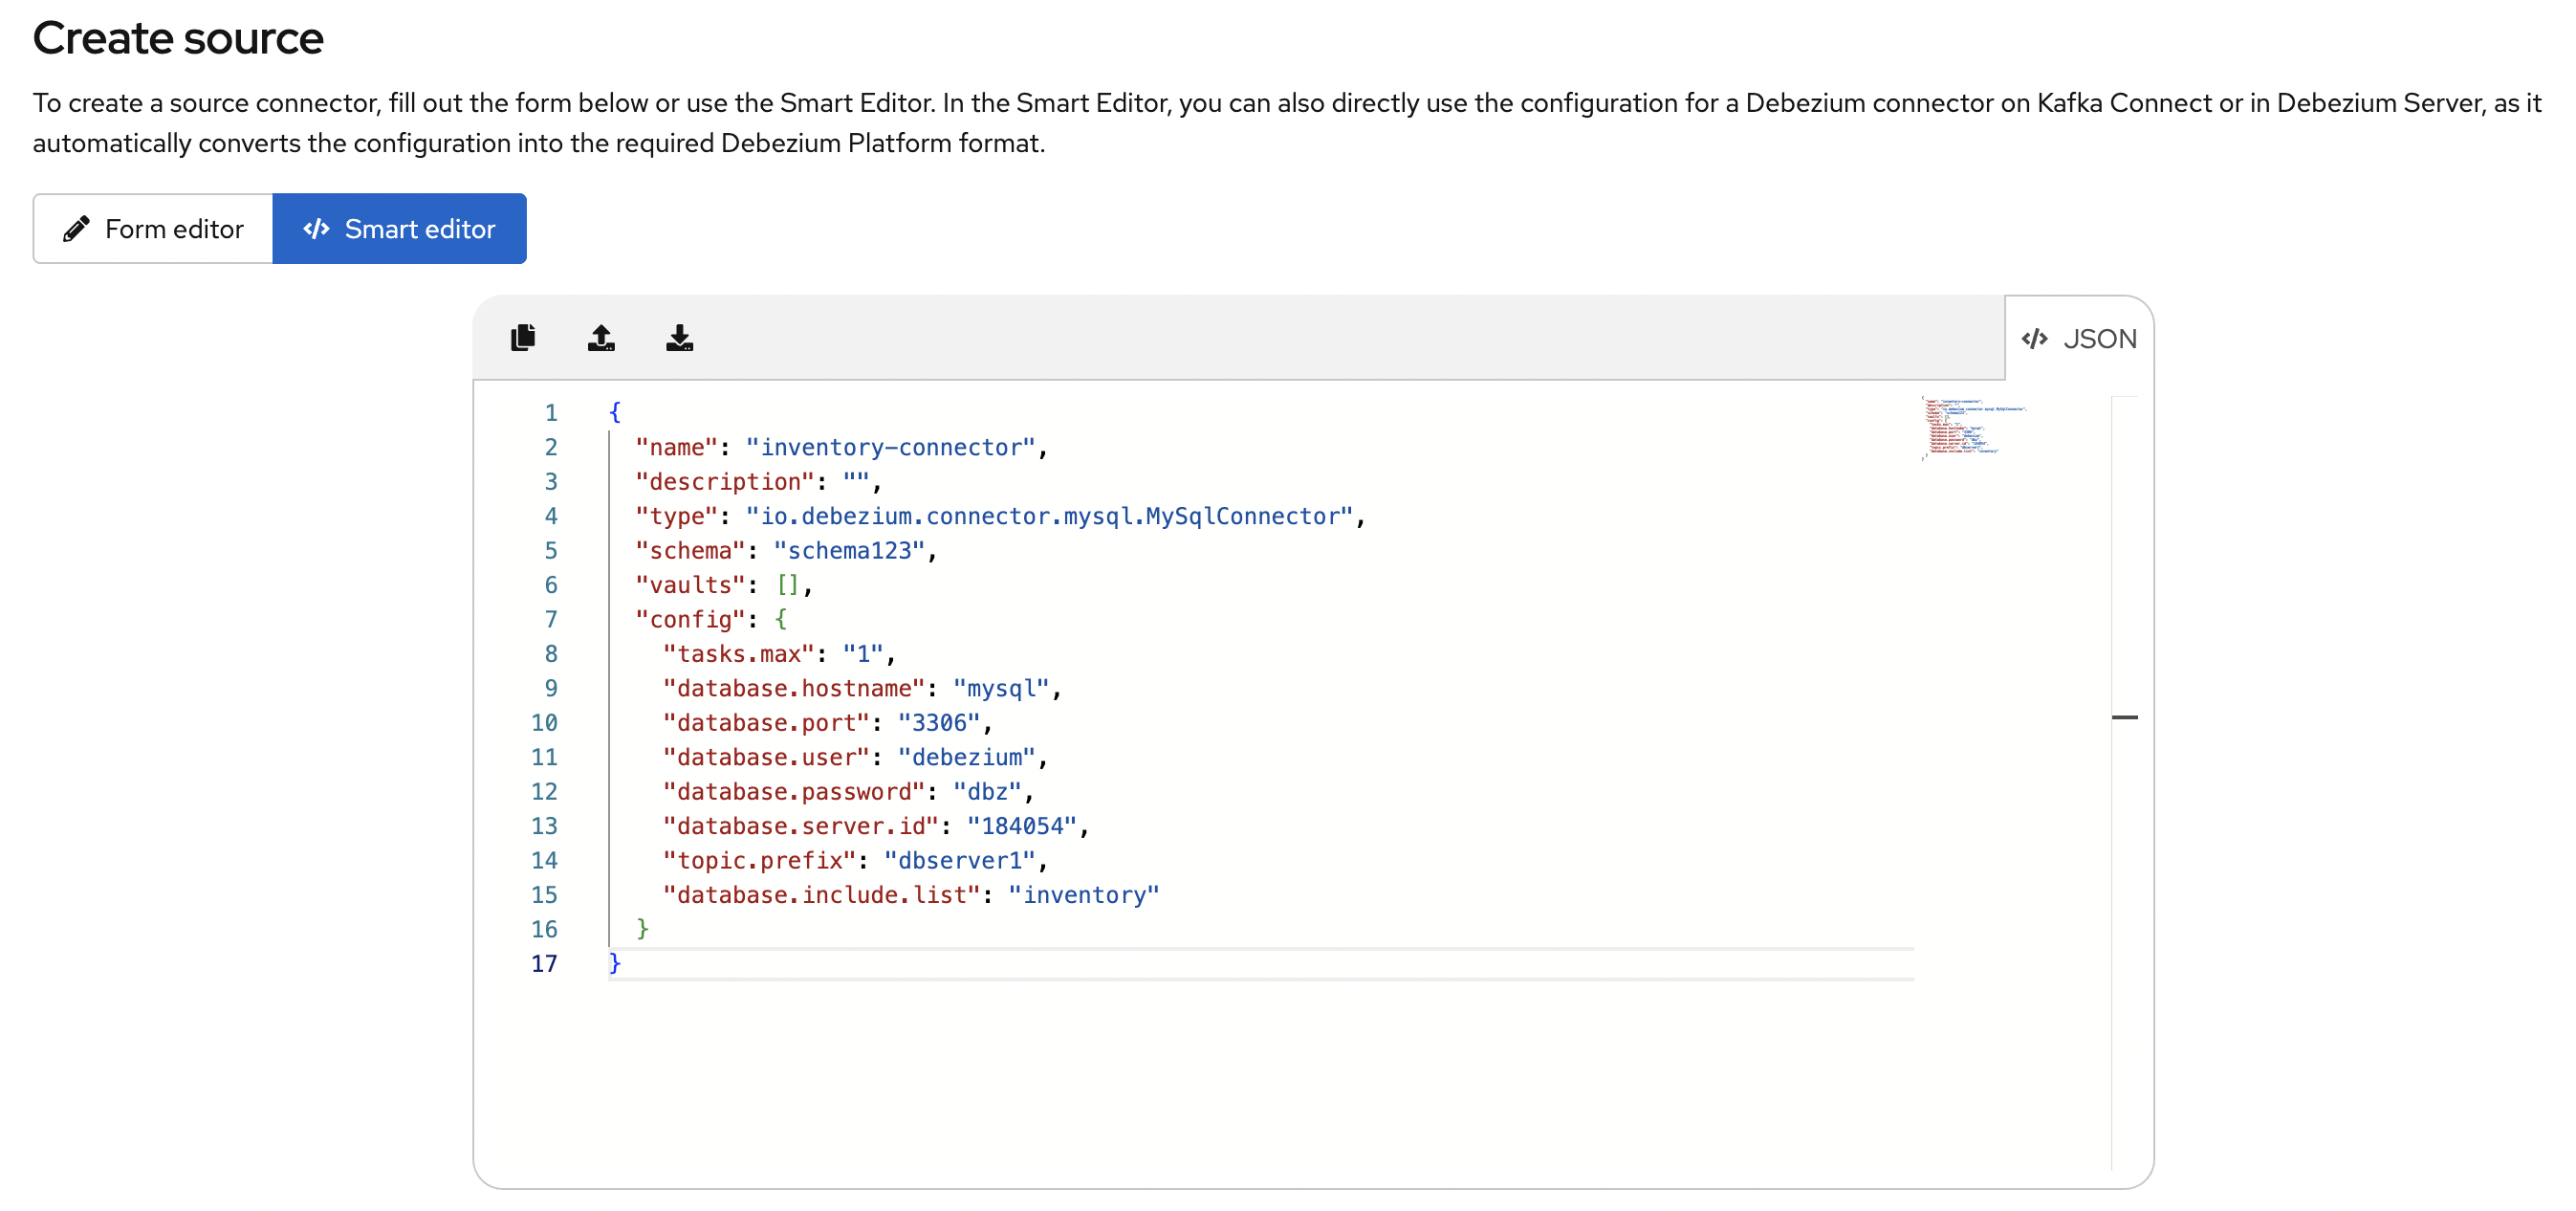
Th following example shows the platform configuration JSON after updates to the name and description fields.
{
    "name": "my-source",
    "description": "This is my first source",
    "type": "io.debezium.connector.mysql.MySqlConnector",
    "schema": "schema123",
    "vaults": [],
    "config": {
        "database.hostname": "mysql",
        "database.port": "3306",
        "database.user": "debezium",
        "database.password": "dbz",
        "database.server.id": "184054",
        "topic.prefix": "dbserver1",
        "database.include.list": "inventory"
    }
}
Similarly, you can open a Debezium Server configuration in the Smart Editor to automatically extract the source configuration and reformat it for use in the Debezium platform. For more information, see Configuring a destination with the Smart Editor.
Deleting a source
-
The source that you want to delete is not in use in any pipeline.
-
From the platform UI, open the Source menu, click the Action menu for the source that you want to delete, and then click Delete.
An error results if you attempt to delete a source that is in use. If the operation returns an error, verify that the source is no longer used in any pipeline, and then repeat the delete operation.
Editing a source
To edit a source, from the platform UI, open to the Source menu, click the Action menu of the source that you want to edit, and then click Edit.
|
Editing a source affects all pipelines that use it. Before you submit a change, a message notifies you that pipelines that use the source will restart. 
|
Defining destinations
Use the Destination section of the UI to specify the data sink to which the platform sends source data. All Debezium Server sinks are available as destination. When you create a destination, it can be shared between different pipelines, which means that every change to a destination will be reflected in every pipeline that uses it.
Creating a destination
Use the Destination section of the UI to configure the sink destinations to which the platform sends data. You can use either of the following editors to configure a destination:
- Form Editor
-
Enables you to specify the name and description of the destination, along with a list of properties. For a complete list of the properties that are available for a sink connector, see the connector documentation.
- Smart Editor
-
Enables you to define the sink configuration in JSON. Alternately, you can extract a Debezium Server sink configuration and automatically reformat it for use in the platform.

To create a sink destination from an existing Debezium Server configuration, from the Destination catalog page, click Create using smart editor . |
Configuring a destination with the Smart Editor
You can use the Smart Editor to specify the JSON that defines the source configuration.
You can enter and edit JSON directly in the editor, or paste JSON from an external source into the editor.
With a few small differences, the JSON that you use to configure a destination in the Smart Editor is nearly identical to the configuration that you use to define a Debezium Server sink.
You can directly use a Debezium Server configuration by either uploading it, or pasting it into the Smart Editor. The Stage UI intelligently recognizes the configuration type and prompts you to reformat it for use by the platform. The editor automatically extracts the Debezium server sink configuration and converts it into the JSON format that the platform supports.
For example, consider the following properties from a Debezium Server configuration:
# ...

debezium.sink.type=pubsub
debezium.sink.pubsub.project.id=debezium-tutorial-local
debezium.sink.pubsub.address=pubsub:8085
debezium.source.connector.class=io.debezium.connector.mysql.MySqlConnector
debezium.source.database.hostname=mysql
debezium.source.database.server.id=223344
debezium.source.database.port=3306
debezium.source.database.user=debezium
debezium.source.database.password=dbz
debezium.source.schema.history.internal=io.debezium.storage.file.history.FileSchemaHistory
debezium.source.schema.history.internal.file.filename=data/schema.dat
debezium.source.offset.storage.file.filename=data/offsets.dat
debezium.source.offset.flush.interval.ms=0
debezium.source.topic.prefix=tutorial
debezium.source.database.include.list=inventory
debezium.source.table.include.list=inventory.customers

# ..
When you add the preceding properties file to the Smart Editor, it confirms that it recognizes the file as a Debezium Server configuration.
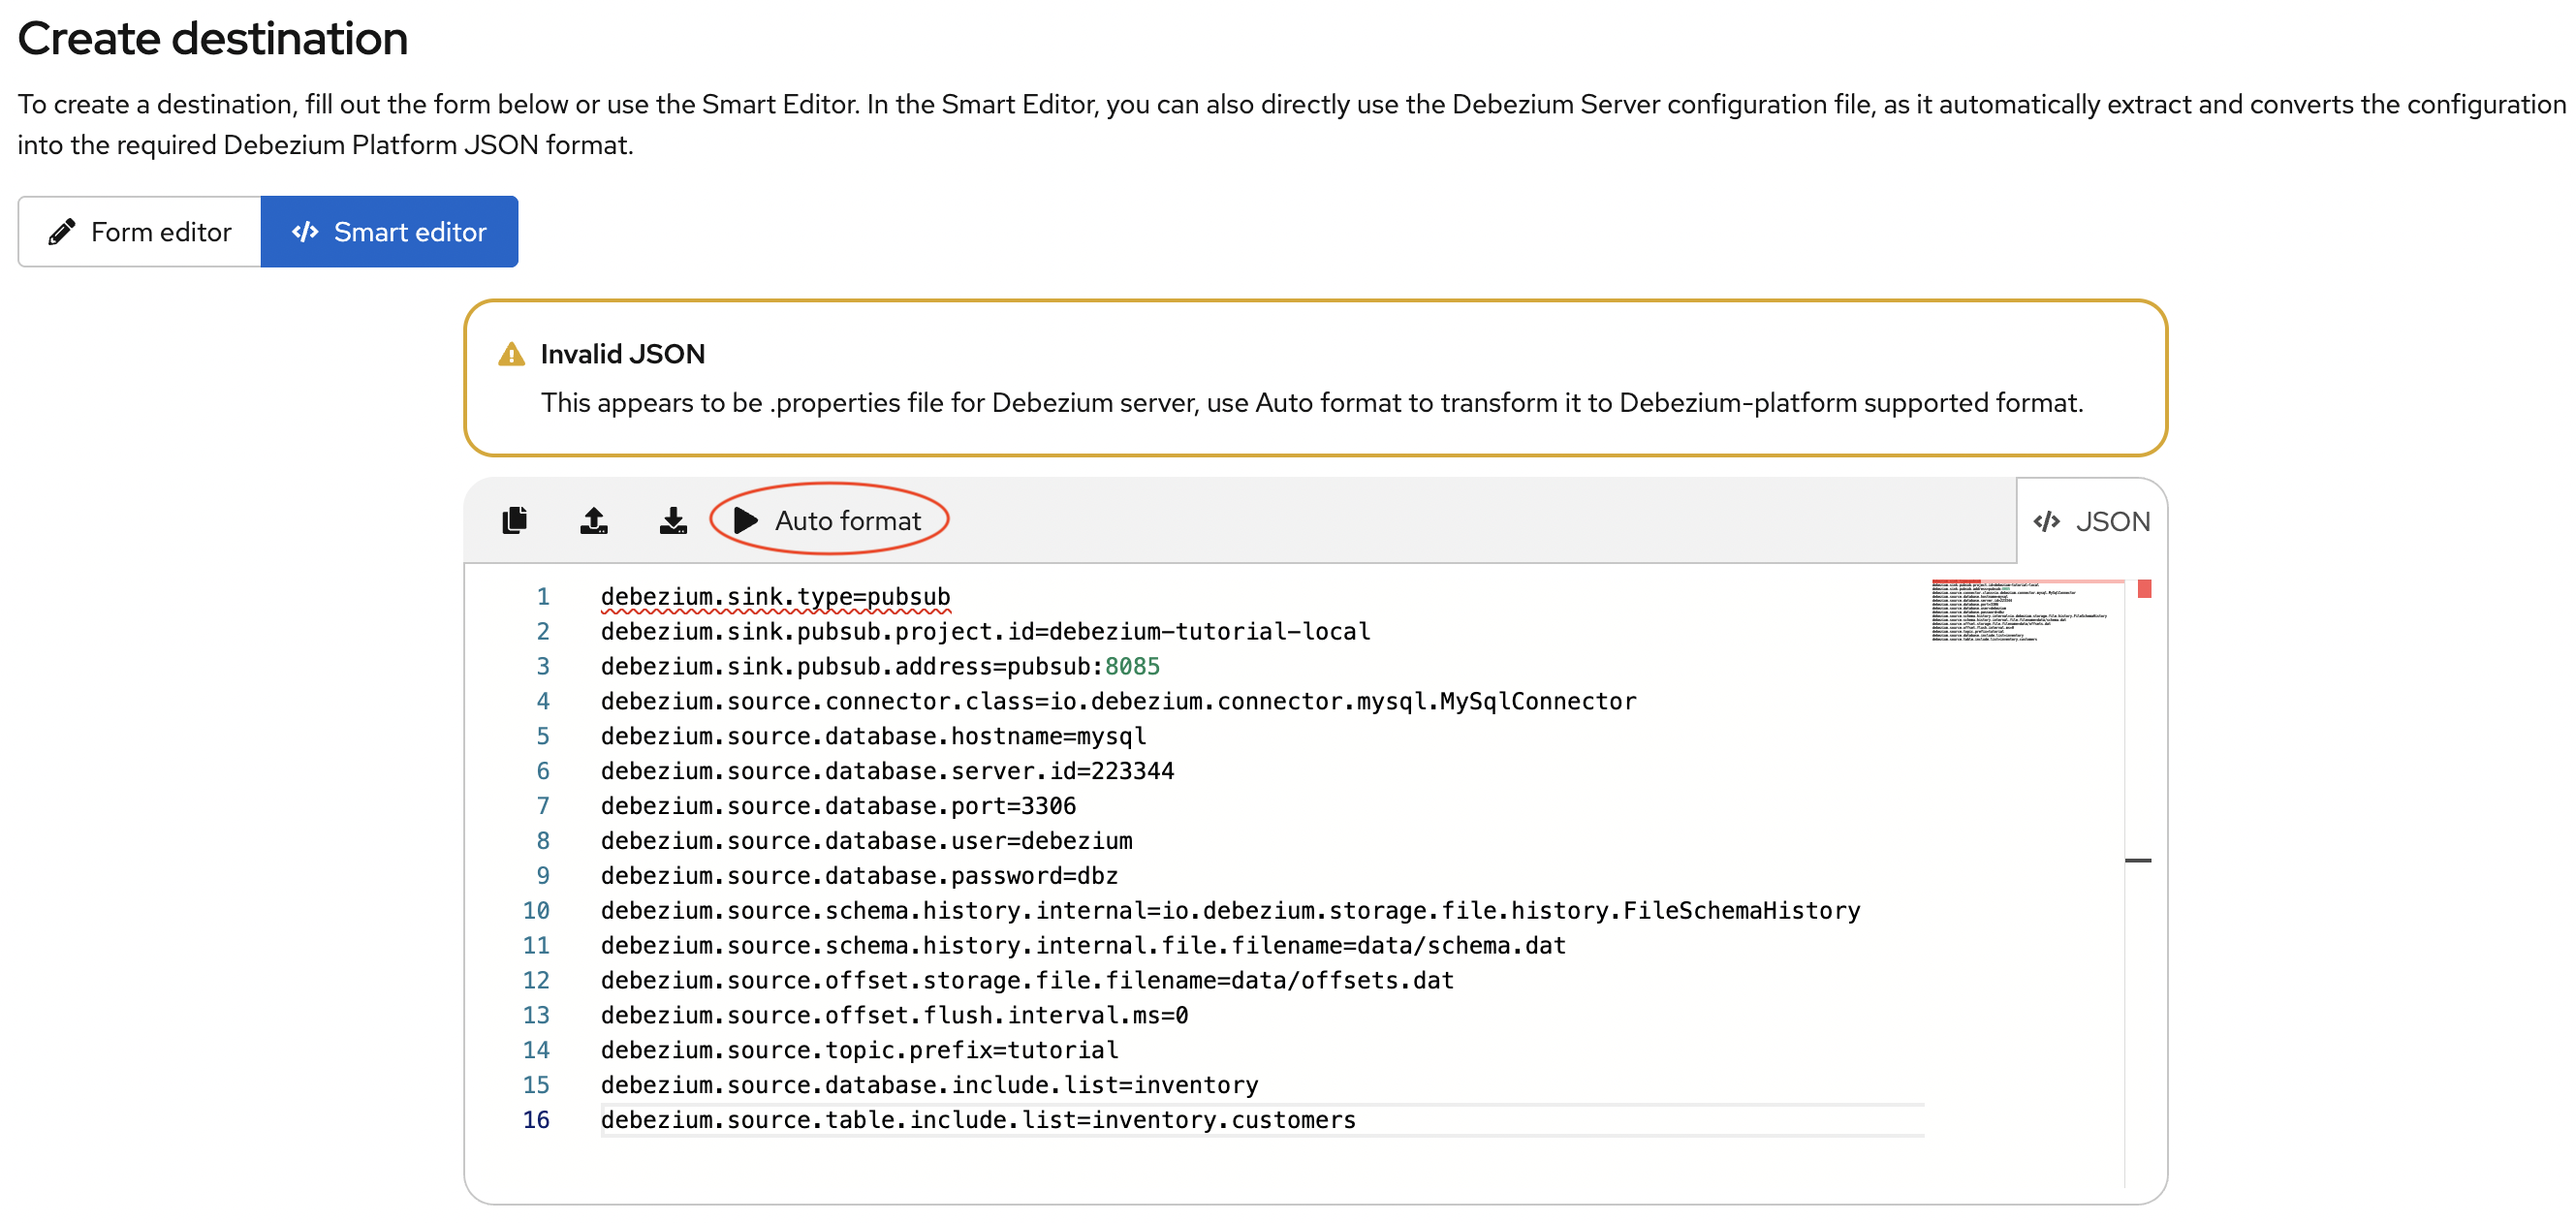
The Smart Editor toolbar displays an Auto Format option, as shown in the preceding image. Select this option to automatically extract the sink configuration and convert the sink properties into the JSON format that the Debezium Platform supports.
The following image shows the JSON that results after the editor automatically formats the publish-subscribe sink properties that you added.
Edit the JSON to update the value of the name field, and optionally populate the description field.
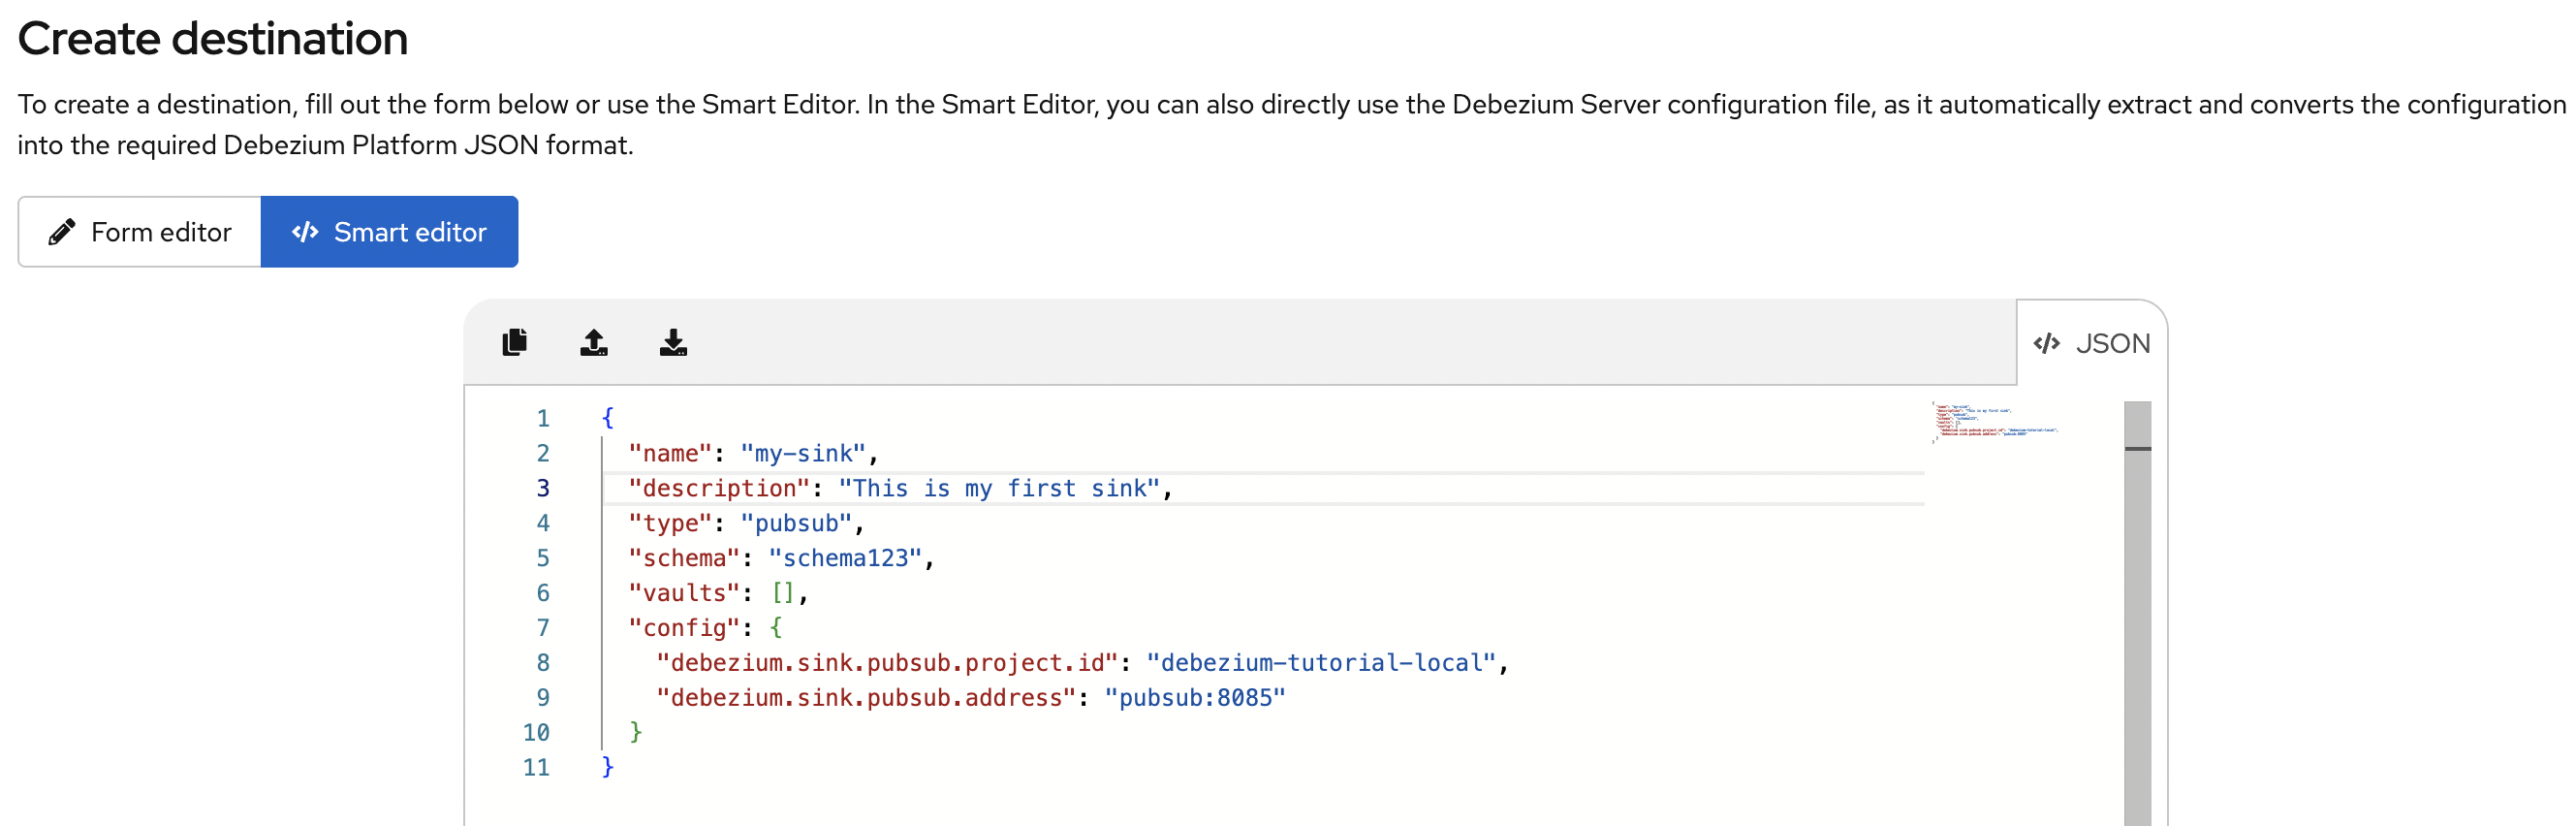
After you update the name and description, the following JSON results:
{
  "name": "my-sink",
  "description": "This is my first sink",
  "type": "pubsub",
  "schema": "schema123",
  "vaults": [],
  "config": {
    "debezium.sink.pubsub.project.id": "debezium-tutorial-local",
    "debezium.sink.pubsub.address": "pubsub:8085"
  }
}
Deleting a destination
-
The sink that you want to delete is not in use in any pipeline.
-
From the platform UI, open the Destination menu, click the Action menu of the destination you want to delete, and then click Delete.
An error results if you attempt to delete a destination that is in use. If the operation returns an error, verify that the destination is no longer used in any pipeline, and then repeat the delete operation.
Editing a destination
To edit a destination, go to the Destination menu and then click the action menu of the destination you want to edit, then click Edit.
| Editing a destination affects all pipelines that use it. After you make a change, a confirmation message informs you that pipelines that use the destination will restart. |
Managing transforms
Use the Transforms section of the platform UI to manage the transformations that you want to use in your data pipeline.
Currently, the platform supports all single message transformations provided by Debezium as well as any Kafka Connect transformations.
Transformations are shared among pipelines. When you modify a transformation, the changes are reflected in all pipelines that use the transformation.
Creating a transformation
Use the Transforms section of the platform UI to specify the configure and manage single message transformations.
You can use either of the following editors to configure transformations:
- Form Editor
-
Enables you to specify the name, type, and description of the transformation. You can also set additional configuration options that are specific to the transform type.
Optionally, if you want to apply the transformation only to records that meet specific criteria, you can specify a predicate. You can choose the predicate from a list, and set its properties.
- Smart Editor
-
Enables you to use JSON to configure the transformation.
Using the Smart Editor to configure transformations
You can use the Smart Editor to specify the JSON that defines the transform configuration.
You can enter and edit JSON directly in the editor, or paste JSON from an external source into the editor.
The format for configuring transformations in the Smart Editor differs from the Kafka Connect format that Debezium uses to configure transformations, but you can easily convert between formats.
Typically, entries in the configuration of a transformation are prefixed with transforms.<transform_name> where <transform_name is the name assigned to the transformation.
For example, in Debezium, the following configuration is used with the unwrap (ExtractNewRecordState) transformation:
# ...

transforms=unwrap
transforms.unwrap.type=io.debezium.transforms.ExtractNewRecordState
transforms.unwrap.add.fields=op
transforms.unwrap.add.headers=db,table
predicates=onlyProducts
predicates.onlyProducts.type=org.apache.kafka.connect.transforms.predicates.TopicNameMatches
predicates.onlyProducts.pattern=inventory.inventory.products

# ..
To adapt this configuration for use in Debezium platform, convert the properties that include the prefix transforms.unwrap, except for transforms.unwrap.type, to JSON format.
Apply the same process to convert predicate statements.
| Smart Editor support for directly using the Kafka Connect configuration format is planned for a future release. |
After you convert the Debezium configuration for the unwrap transformation, the following JSON results:
{
  "name": "Debezium marker",
  "description": "Extract Debezium payloa d",
  "type": "io.debezium.transforms.ExtractNewRecordState",
  "schema": "string",
  "vaults": [],
  "config": {
    "add.fields": "op",
    "add.headers": "db,table"
  },
  "predicate": {
    "type": "org.apache.kafka.connect.transforms.predicates.TopicNameMatches",
    "config": {
      "pattern": "inventory.inventory.products"
    },
    "negate": false
  }
}
Editing transformations
From the platform UI, open the Transform menu, click the Action menu for the transformation that you want to edit, and then click Edit.
| Editing a transformation affects all pipelines that use it. |
Deleting a transformation
-
The transformation that you want to delete is not in use in any pipeline.
-
From the platform UI, open the Transform menu, click the Action menu of the transformation you want to delete, and then click Delete.
An error results if you attempt to delete a transformation that is in use. If the operation returns an error, verify that the transformation is no longer used in any pipeline, and then repeat the delete operation.
Creating and managing pipelines
The pipeline section is the place where you connect the "dots". You can define where your data comes, how to eventually transform them and where they should go.
Creating a pipeline
-
From the platform UI, open the Pipeline menu, and then click Create your first pipeline. The Pipeline Designer opens. From the Pipeline designer, specify the components that you want to add to your data pipeline.
-
Click the + Source box to add a source, and then choose a previously created source, or create a new source.
-
(Optional) Click the + Transform box to apply one or more transformations.
-
Click the + Destination box to add a destination,and then choose a previously created destination, or create a new destination.
The sequence in which Debezium applies transformations to the source is significant and affects the final output. Verify that the sequence that you specify results in the expected output.
In the Pipeline designer* you can delete a transform, or alter the sequence of applied transforms. For more information about using the Pipeline designer, see using the Pipeline designer to remove and order transformations.
|
Transformations that are configured with a predicate are marked with a predicate icon ( |

After you finish designing your pipeline, click Configure Pipeline, and then specify the name, description, and logging level for the pipeline.
Creating a pipeline from a Debezium Server configuration
The Pipeline designer provides an option to create data pipeline resources (that is, source, destination, and transforms) by uploading an existing Debezium Server configuration properties file .
-
In the Pipeline designer, click DBZ server config, upload, or drag and drop a Debezium server properties file, and then click Create. The designer creates the Source, Transforms, and Destination for the pipeline, based on the Debezium server configuration that you provided.
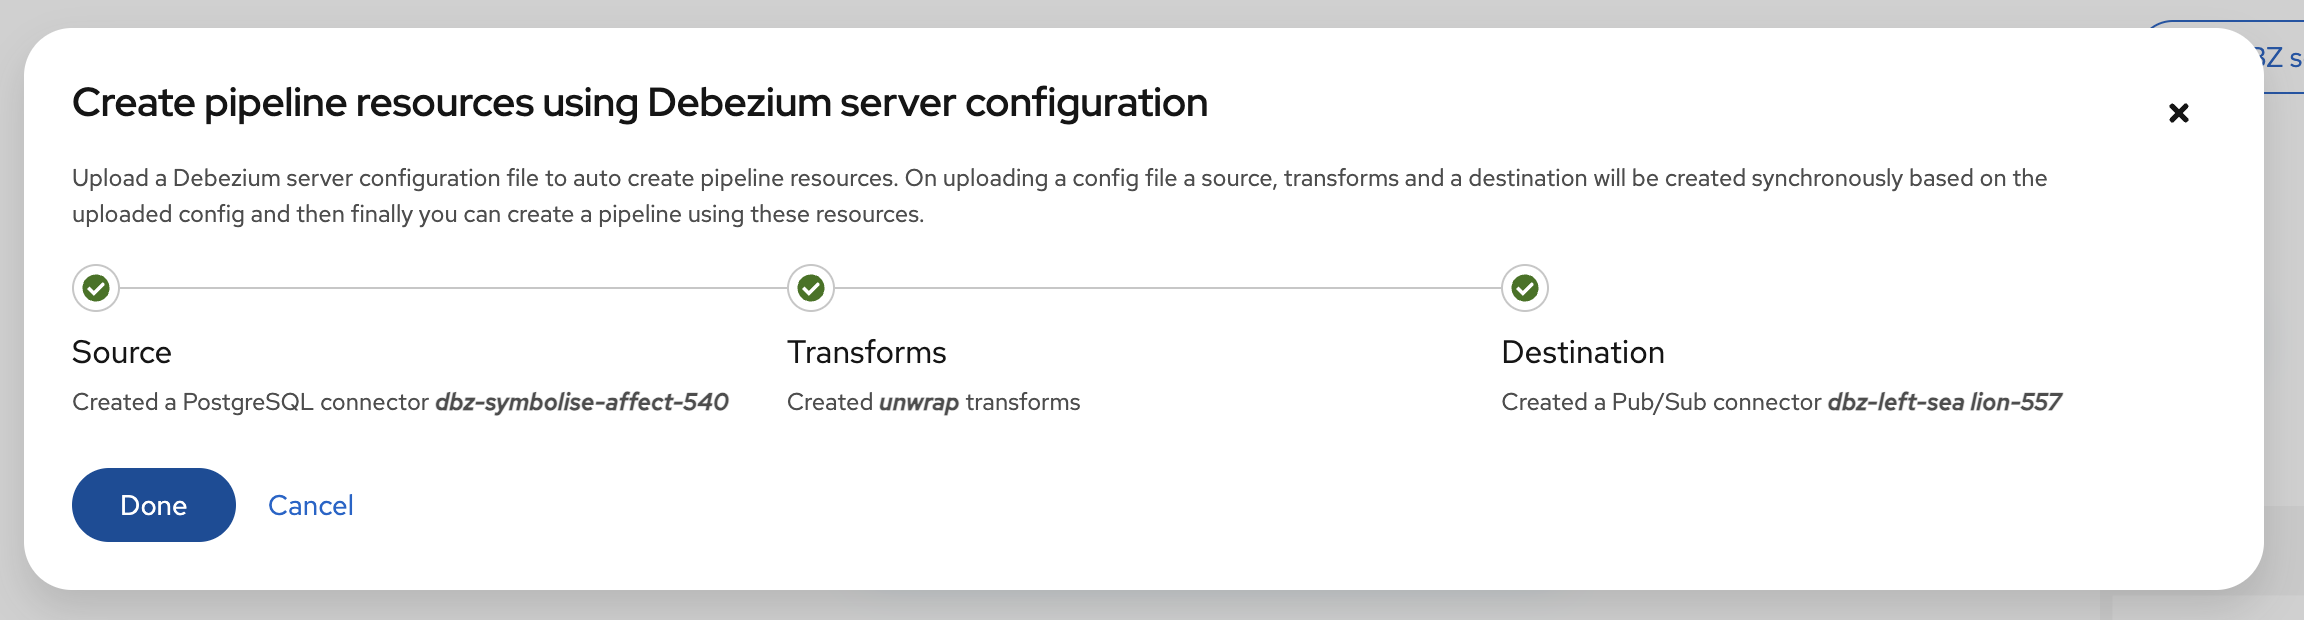
| The source and destination names are generated automatically. |
Deleting a pipeline
From the platform UI, open the Pipeline menu, click the Action menu for the pipeline that you want to delete, and then click Delete. The deletion removes only the pipeline: the source, destination, and any transformations are not deleted.
Editing a pipeline
-
From the platform UI, open the Pipeline menu, click the Action menu for the pipeline that you want to edit, and then click Edit.
-
In the Pipeline designer, modify transformations as needed. For more information about using the pipeline designer, see Using the Pipeline designer to remove and order transformations.
-
Click Save and next to edit the name, description, and log level properties of the pipeline.
Using the Pipeline designer to remove and order transformations
From the Pipeline designer, you can delete transformations, or rearrange the order in which they run.
-
From the Pipeline designer, click the pencil icon (
 ) in the Transform box.
 -
From the Transform list, click the trash icon next to the name of the transform.
If you configure a connector to use multiple transformations, you can use the Transform list in the Pipeline designer to specify the order in which they are applied. The first transformation in the list processes the message first.
-
From the Pipeline designer, click the pencil icon (
) in the Transform box. -
From the Transform list, drag transformations into the order in which you want to apply them, and then click Apply.